SafecomLink (for Pactor modem) Quick Start Guide
- SafecomLink

- Apr 23
- 5 min read
Updated: Apr 25
Before you start
Great! you have installed SafecomLink for Pactor modem, now what?
This short guide will help to make your first steps in the SafecomLink world and conduct your first successful Link using SafecomLink while highlighting the "must-know" features.
Basic SafecomLink Configuration
Make sure your Pactor modem is connected to your PC, either via a COM port or an Ethernet (LAN) cable.
Install SafecomLink in a dedicated directory. We recommend using the default installation path: C:\SafecomLink.
If you used the ZIP package instead of the installer, make sure to extract it into the same directory as your previous installation.
Double-click the SafecomLink.exe file to launch the application.
You will be prompted to enter your license code. Enter it and verify that it matches your callsign, package (Standard / Professional / Enterprise / Hamradio), and expiration date.
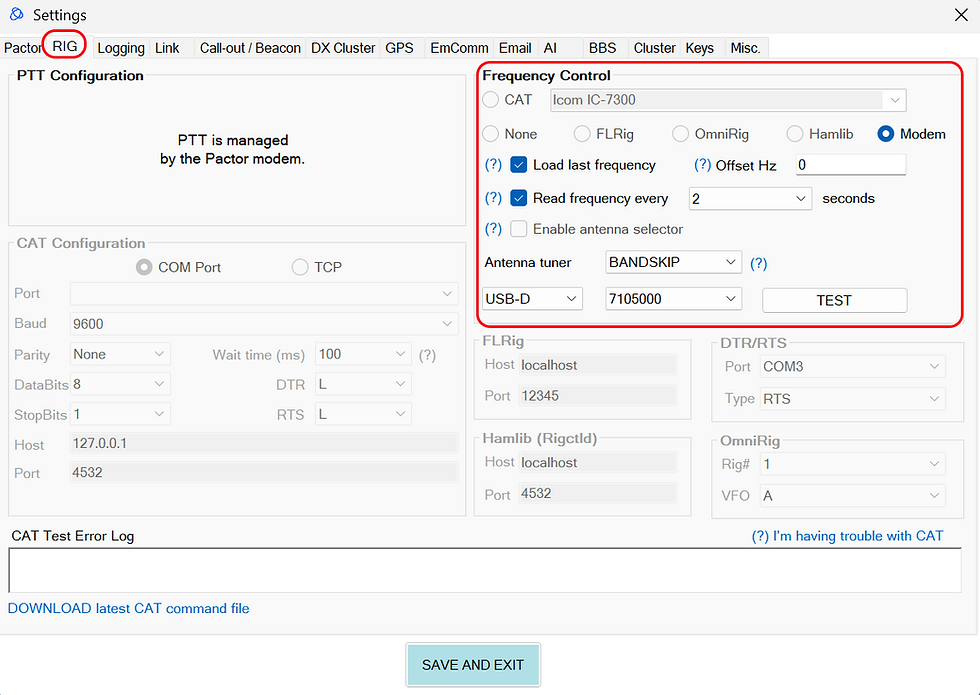
From the top menu, select: Settings → Modem, RIG and SafecomLink Configuration.
Under the “Pactor” tab, set your modem’s COM port (or IP address if using LAN).
Configure your desired RIG (transceiver) control:
MODEM – Choose this if your modem is already connected to your transceiver via CAT control. SafecomLink will send commands to the transceiver through the modem. Select the transceiver type and TTL setting (for most modern transceivers, leave TTL unchecked).
DIRECT – Choose this if your modem does not provide CAT control of your transceiver. In this case, go to the “RIG” tab and configure your transceiver control there to allow SafecomLink to change frequency when needed. Use the TEST button to verify communication.
Click “SAVE & CLOSE”.

If using “DIRECT”, set your preferred transceiver control method here.
Tune
Before operating for the first time, you need to tune the audio levels of your PACTOR modem.
Click the TUNE button. Your modem will key the transceiver and transmit a steady two-tone signal.
Use the slider to adjust the modem’s audio level while monitoring your transceiver’s ALC. Aim for around 70% ALC for optimal performance.
Click STOP to end the tuning process. That’s it, you’re ready to transmit.

Beacons
A Beacon is a transmission that is sent every 15 minutes by default, letting others know that you are online and ready for a connection.
What should I use then?
Looking to chat with someone right now? Hit Call-out (CQ). No answer? Try again a couple of times.
Want to leave your transceiver open and accept incoming connections while you go about your business? Hit the BEACON button.
Tip
If you leave your RIG tuned to a frequency while SafecomLink is open, you will receive other users’ beacons and see who is available.
Double-click their callsign to connect with them.
Call-Out (AKA CQ)
When performing a call-out, you can select a SLOT frequency where you will wait for incoming connections.
Your call-out encodes this SLOT ID so other stations know where to connect with you.
SafecomLink will automatically change frequency to the selected SLOT after the call-out ends.
When you initiate a call-out, your call will be both seen and heard (via an alert sound) by other SafecomLink users who are tuned to the same frequency.
How do I connect with someone?
There are three simple ways to start a link:
Double-click a callsign in the “Call-outs” section.
Double-click a callsign in the “Beacons” section.
Type the callsign you want to connect to in the connect-to textbox and click “CONNECT.”

What are all these texts and numbers I see when connected to someone?
Upon connection, you may see messages such as “<R-10>” or “de YOURCALL.”
SafecomLink exchanges SNR (Signal-to-Noise Ratio) reports with the other station, so you can see how well you are being received and for logging purposes.
SafecomLink also periodically transmits your callsign over the air to comply with self-identification regulations.
SafecomLink gestures
Gestures are text codes that, when typed as part of your chat message, trigger an event on the other side, such as:
“RING!” – plays a ringing sound to grab attention.
“HIHI” – displays a smiley emoji 😀😀
“TU!” – sends “THANK YOU 🙏”
Click the “GESTURES” button to see more options.

Canned messages & SafecomLink Tags
Canned messages are predefined texts such as your personal information, templates, or frequently used replies. You can configure them in the Settings menu -> Canned messages.
Once created, you can attach a canned message to your chat by selecting it from the “Load a canned message” dropdown menu.
SafecomLink Tags are used either manually or within canned messages to send structured information that the other side can decode and automatically populate the contact log, including your name, (City) QTH, and locator.
Tip
Upon connection, press the F1 button to send your first canned message, which typically includes your information (name, QTH, locator, etc.).
Ending a link
Hit the "DISCONNECT" button.
Need to eject quickly for any reason? Click the “ABORT” button.

Logging the link
SafecomLink logs contacts in an ADIF file located in the SafecomLink installation directory, named SafecomLink_qso_log.adi, as well as in an internal SQLite database, SafecomLink.db.
You can configure SafecomLink to automatically log each contact upon disconnection, or manually log it by clicking the “LOG” button.

Broadcasts
SafecomLink allows you to send asynchronous messages, also known as broadcasts. You can send a broadcast to a specific person or to all users. Unlike a SafecomLink link, broadcasts do not include a delivery-guarantee mechanism.

Tip
You can use broadcasts for group chat when you and your partners have good signal conditions.
The change-frequency (QSY) code of behavior
Calling frequencies are used for finding link partners and for short connections only.
If you want to continue chatting with your partner, send VMail (SafecomLink mail), or transfer a file, you should immediately invite your partner to change frequency after connection.
In most cases, you will be prompted to perform a frequency change right after connecting.
There is no need to disconnect! frequency change is done while you remain connected.
How does it work? Click the UP/DOWN buttons to shift frequency one slot up or down (±750 Hz when using a VARA modem, or ±2500 Hz when using a Pactor modem), or use the “#” sign to select any slot/frequency you want.
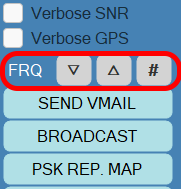
This will initiate a frequency change request, instructing both stations to move to a new frequency while continuing the session.
If your transceiver control is configured correctly, SafecomLink will automatically change the frequency for you.
Again: there is no need to disconnect before or during the frequency change.
SafecomLink Advaced mode
By default, SafecomLink launches in Simple mode, displaying only the essential controls needed to operate it.
Once you feel comfortable, we encourage you to switch to Advanced mode using the top-right dropdown. This will reveal the full SafecomLink interface and unlock a richer, more powerful experience.

Still have questions ?
This quick start guide covers the essential information you need to get started. However, SafecomLink includes many additional features you can explore, such as file transfer, frequency scheduler, VMail, alert center, last-heard peeking, email/AI gateway, and much more.
We wish you success with your first steps in SafecomLink.
Tip
If you wish to take the full training, we invite you to check out the SafecomLink Academy, featuring 13 online training videos that guide you step by step through everything you need to master SafecomLink.